In the world of blogging and web design, archiving issues are still the main way to attract website visitors and realize business models. Sitemaps play an important role in SEO and are one of the fundamental tools that help Google index your website’s pages and display them in search results. We wrap up this dilemma with detailed steps on how to create a simple and effective sitemap for your blog and the importance of addressing issues that reduce expected returns.
.webp)
What is a Sitemap file?
Adding sitemaps and submitting them to Google Webmaster Tools Google Search Console will help Google and other search engines understand your site structure and updates faster, which means more chances to find your site content and increase traffic, and in After confirming your ownership of your blog on Blogger, you can send files. Sitemap.xml Get your articles registered with Google and increase the speed at which they appear on search engines through the Sitemaps section of Google Search Console Webmaster Tools, which is what we’ll be discussing in this article, God willing.
Blogging The Importance of Blog Sitemap Files
Be sure to add the robots.txt file and sitemap file in Google Webmaster Tools, and in order to do this, you must follow the correct method so that your website will not be blocked. This can cause your articles and blogs to fail to successfully archive in search engines, which can also cause your site to appear in search engines. Follow the instructions, God willing, and you’ll be able to render the best sitemap.xml file or sitemap and troubleshoot archiving your blog’s steps.
How to add sitemap.xml file
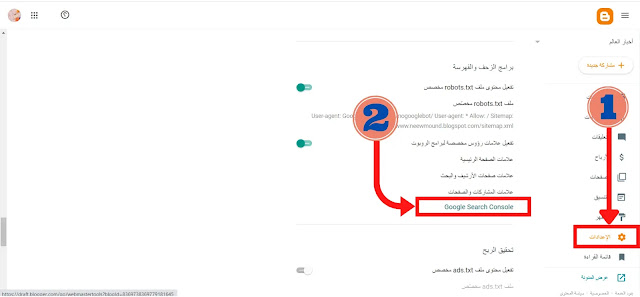
first step: Access Site Administration Tools. Google console with blog URL. That is to enter “Settings” at the beginning, and then we follow the steps below to use the “Blog Address” option to access the URL of the blog, copy the address as shown in the figure below.
Step two: Switch to “Crawlers and Indexing” and click on “Google Search Console” as shown in the image below.
.webp)
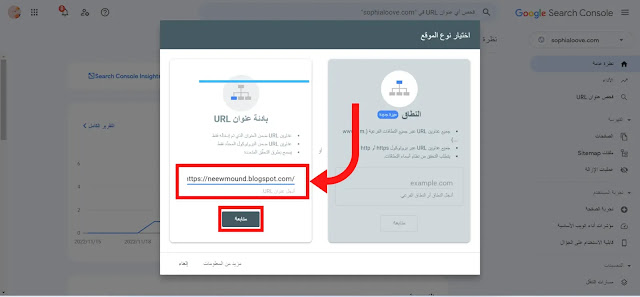
third step: Simply clicking on the Google Search Console option will take us directly to the Site Manager tool where we can register our blog by entering the blog’s URL as shown in the image below. https://www.exampe.com/
so that we modify the name of the example we copied earlier in the blog.
the fourth step: After that, we click on the “Continue” option as shown in the image below.
.webp)
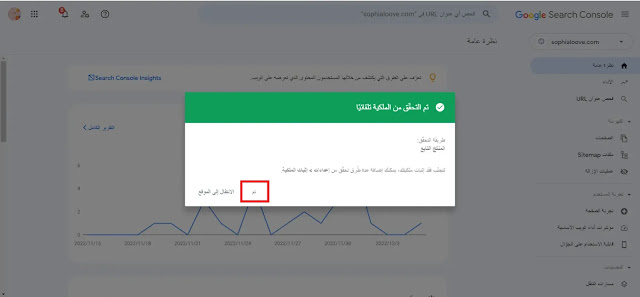
the fifth step: After that, the following reasoning interface will appear until we verify the ownership of our blog on the website, then click the “Finish” button according to the illustration in the image.
.webp)
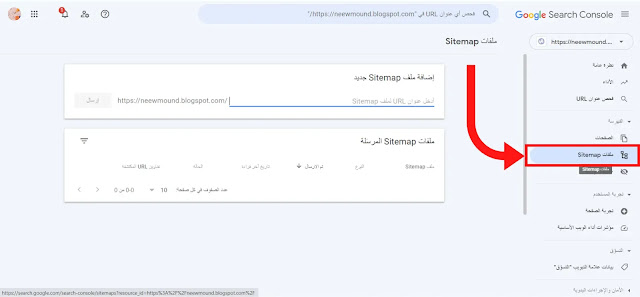
Step six: Add a sitemap icon.
After that, the webmaster site tools interface will appear in front of us, and then we will go to the “Sitemap file” option according to what is shown in the attached image.
.webp)
Step seven: After that, load the code files we need, we copy all the sitemap codes in turn, and then add the blog address at “Example”. After that, use webmaster tools to add the copied code to your sitemap file as shown in the image below:
Sitemap code:
Next, we place the sitemap symbol as shown in the image below:
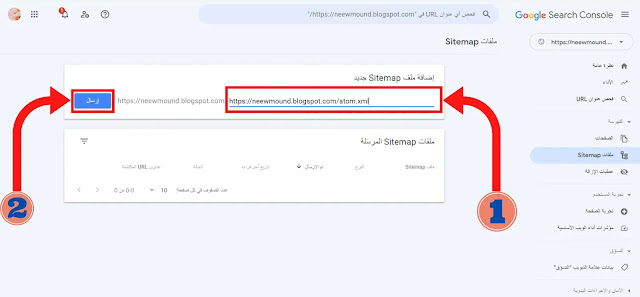.webp)
We added all the codes until they were all added, and the website told us that the addition was successful. Green is shown in the image below.
.webp)
Once this step is complete, we archive the site and its articles so they can appear in search engines.After a few days, our articles and posts will be automatically filtered to the engine
If it doesn’t show up in a short time, you need to worry.
– Finally, here we have finished explaining how to index Blogger blogs and articles and posts, we hope you have benefited from this simplified explanation, if you enjoyed this information, please share it with others and don’t forget to encourage us and Leave us a comment in the article and wish you all the best.

.webp)